

In my over 10 year career as a designer, I’ve seen countless reasons to implement fillable pdfs. My casino days showed that sometimes the property managers need to quickly switch out information, so to keep branding consistent I get to create a template with fields they can add their own text or pictures to. HR will request them to make it easier to fill out different employee forms, needing things like dropdowns to specify predetermined departments or date pickers that look like a calendar. Working at Substrata gave me the opportunity to create more public facing forms, ones that the sales team would use to customize their quotes for their customers, but that needed to be sealed once customized so no one else could change the information. There are a ton of reasons to need a fillable form, so today I’d like to share a handful of the tips I’ve learned throughout my career and step by step instructions on how to accomplish these.
Tools Needed
The majority of form setups can be accomplished with Adobe Indesign, but special customization needs to be done through Adobe Acrobat (the go-to Adobe pdf viewer). Some of these tips may require you to import code, and unfortunately that isn’t possible through the indesign interface, so you have to add that in after exporting.
Locking font colors and capitalization
Some brands use specific capitalization for headings, and if you’re setting something up that might become public facing you want to make sure the form is “fool proof”. The honest fact is that people make mistakes, and when a team member isn’t used to working with design tools it’s highly likely they won’t pay attention to something like the capitalization of their heading. I ran into this with the Durango Casino property, when the marketing manager needed templates made for their event rooms. These templates would be used to display the event name and any other important information, but above all else it was essential that this piece be on brand because it was going to be public facing. Of course, that means setting the fonts and colors to match the brand, including making sure the headers were always in ALL CAPS.
Let’s start by setting the font in Indesign. I like to design the form with a placeholder font to make sure I have an idea of how I want it to look once the user inputs their information. You can use that font as a guide for the properties of the text box. Once you have your form set up the way you want it, it’s time to add in the editable text boxes.
Having the box you want to make editable selected, you want to navigate to the buttons and forms window. If you don’t already have it on your toolbar you can open it using Windows>Interactive>Buttons and Forms. The window should look like this.

You’re going to want to assign this box as a text field using the top dropdown.

Next, you’re going to fill in the bottom section that specifies the size, font, multiline, etc.

Once you have it the way you want, it’s time to export! Make sure to export it as an interactive pdf, or else none of your form fields will show up.
Now that you have your form exported, it’s time to assign colors and capitalization! After opening the pdf, you want to navigate over to the “prepare a form” tool in Acrobat. That will open up a window on the right of your screen displaying all the active interactive elements.
Right click the field you want to edit, and click on the “properties” option from the dropdown. It should open up a window that looks like this.

From here we want to go to the “appearance” tab, where you can edit the font, size, and color of the text field. Go ahead and set that to match your brand standards!

Now that the color, font, and size are all set, it’s time for the more complicated feat: locking capitalization. For this, you’ll need to do a tiny bit of coding, but don’t worry I’ll provide the code here! With the properties panel still open, you’re going to navigate to the “format” tab. It should look like this.

You’re going to want to set the format category to “custom”, which opens up two options to interact with, “Custom Format Script” and “Custom Keystroke Script”. For this, we’ll be using the latter.

You’re going to click on the “edit” button next to the Custom Keystroke Script section. It should open up the javascript editor, where you can add the following code:
event.change = event.change.toUpperCase();

Next, click ok, then the close button in the bottom right of the properties screen, and you’re done! Now any text written in this textbox will display as all caps, and you don’t have to worry about your brand getting even a little diluted.
One last note for this, if you have a specialty font you are using for your brand make sure to send the font files to your team member to download on their computer. Adobe acrobat pulls from the fonts on the users system, so if your font isn’t there it will pick the next closest thing available. If this is a public form that anyone can access, then you’re going to want to pick out a web friendly font that aligns with your brand. These fonts are more likely to already be installed on most computers.
Allowing users to add photos
Sometimes you need to allow users to add in their own photos to your fillable pdfs. That was the case for HR artwork I made for Station Casinos. This piece was going to be given to each property to display on their digital screens in the BOH (back of house) space. I created artwork that matched a new campaign we had developed, but each property wanted to personalize it with photos and quotes of their own team members. Sometimes team members left, and they wanted to be able to switch out photos whenever they needed to. So, the need for a fillable pdf was born.
The only tricky thing about adding photo blocks that people can upload their own photos to, is that they can only take one orientation (landscape or portrait). So, just keep that in mind if you do this for yourself you need to communicate to the user not to try to use any other orientations or it could get funky.
You can’t set up interactive image boxes in indesign, at least not in the way we need to for this project. While building out what I like to refer to as the “bones” of the piece, make sure to use placeholder images for where we will be adding in the images. I like to make these a 6X4 ratio since most images come in that size, and once they add in the image the system will auto size it to fit the space.
Once your bones are all set up, we’re going to export it and reopen it in Acrobat then navigate over to the “prepare a form” tool. Next, we’ll pick the “image field” option from the toolbar.

Your mouse will turn into a crosshair with a box silhouette. You’re going to need to position it so the middle of your crosshair is over the upper left corner of one of your placeholder images, then click and drag it over to the bottom right corner to cover the placeholder image. Once you release it, your new form should pop up under the fields window!
Now there’s not much else to do but test it out by switching out of the prepare a form tool and uploading your own image. If it looks slightly off, readjust by going back into the prepare a form tool and navigating to the button’s properties panel.
This feature is great for many different situations, not just uploading photos of your staff. I had an event fillable form project for Durango where they wanted to be able to upload the logos of any companies renting out certain ballrooms. That project took a lot of forethought, as not all logos are landscape, some are a narrow portrait shape. I ended up creating multiple templates to accommodate different logo shapes. I also had to consider that some logos may not work on colored backgrounds, but all logos are designed to work on white. So I intentionally created a nice white space for the logo to sit.
Turn off editability with a click
During my time at Substrata as Creative Director, I worked very closely with the sales department. What I found was that a lot of the quote materials they were sending off to customers weren’t branded! I simply had to fix that. So I made a beautifully designed fillable quote package they could fill out with the customers specific project details. It was a multi-page document with information about Perma-Zyme and forms where the sales rep could put in details about the client’s specific project, then a full itemized quote page at the end. It was leagues better than the generic quote sheet they were using, and proved extremely effective. The only tricky part about this project, however, was making it uneditable once it got to the customer (sending editable forms that the client can edit is a bit unprofessional haha). So, I devised a way for them to click a single button once they were done filling out the form, and all the form fields would switch off and leave only the inputted text behind.
To do this yourself we’re going to need a bit of javascript, but don’t feel intimidated, I’ll walk you through how it works!
We’re going to open our fillable form in Acrobat, then navigate to the “Prepare a Form” tool. Once here, you’re going to want to create a button.

You can add an image to this button, or make it a solid color, whatever you need to do to make it stand out so your team member can identify it as the “we want this form to be uneditable” button.
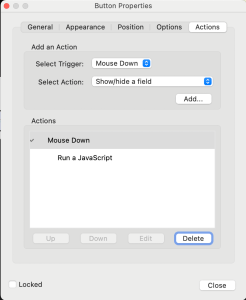
Now, we’re going to go into the “actions” tab of the button’s property screen. Here, we want to make two actions: one to turn off the editability of all the forms in the document, and another to hide the button.
Let’s start with turning off the editability. This is the one we’ll need some javascript for. You’re going to set the trigger to “Mouse Down” and the action to “Run a Javascript”. This means our action will happen after the user has clicked the button. Next, you’ll click the “add” button to add the action to the action list below. It should look like this after you click “add”.
Now, we need to add in the javascript. We can do this by clicking on the “Run a Javascript” action in the white window, then the “edit” button. Our trusty JavaScript editor will pop up. Here, you’ll want to input the following code, replacing the part within the quotes with the name of one of your form fields.
this.getField(“FormFieldName”).readonly=true;
Then, you copy and paste this code as many times as the number of fields you have, and replace each with name with the name of each field. It might look something like this.

After you have all the field you want to turn off editability for, you’ll click on the “OK” button on the bottom of the window to save your changes.
Now, if you click the button all those fields will become un-editable and any text that was in them will stay behind.
We have one last thing to do before we’re done here, that’s hide the button. It’s not super professional to send out an official document with a “click here when done” button at the end of it. So, we need to add one more action to this button in order to hide it.
This one is super easy, same process as the javascript except instead of choosing the “Run a JavaScript” we’ll pick the “show/hide” option. After you click the “add” button, your screen should look like this.

We’ll then edit this new field, and select the name of our button from the list of fields, and make sure the “hide” radio button is selected. It should look something like this.

Next, click the “OK” button, close the properties window. Now you’re all done and can begin your user testing!
Endless Possibilities
There are so many fun things you can do with Acrobat that I haven’t covered, like adding videos or dropdowns or radio buttons. No matter what your business is, fillable forms are a game changer and having a designer on staff that understands how to work with them really ups your game when it comes to brand equity and user experience. It’s also fun to play around with the different functionalities!


